When you are developing apps, depending on the mobile device you want to build for, you may need a different development ecosystem to build that app. We have been working a lot with React Native and we are also planning to explore Flutter for app development. Both of these app development languages are cross platform and can build for Android and iOS (among other platforms). When you want to build for Android, you have a multitude of platforms you can build on, but when you want to build for iOS, you must have a MacOS development platform.
This article is going to walk through how to set up a MacOS VMware Workstation VM. This is directly from Gavin Phillips article on Make Use Of. Here is a link to his original article:
Gavin’s original article is more broad and covers using Virtual Box and using AMD platforms. This article is more for our own documentation in our development ecosystem and is limited to just VMware Workstation on Intel.
Gavin, thanks for your work on this one, it was really helpful.
What files, tools and accounts do you need?
First thing you will need is the latest version of VMware Worstation (or Player if you don’t own Workstation).
https://www.vmware.com/ca/products/workstation-pro/workstation-pro-evaluation.html
Next you will need to get a copy of MacOS. This can be difficult, Gavin provides a link to download this, so please visit his original article for the link. As of the writing of this article Catalina (10.15) is the latest version of MacOS available.
You will need to create an Apple ID if you don’t already have one, and this must be created outside of the vmdk image supplied by Gavin. So go ahead and prepare that ahead of time.
This deployment works best on top of Intel hardware, so you need a computer with adequate additional resources to run the virtual machine (2 additional CPU cores and 4GB RAM minimum as well as HD space).
You will also need to download the VMware Player Patch Tool. This tool will work for VMware Workstation as well. You must run this tool as administrator with no VMs running otherwise you may run into issues with it completing it’s tasks. You can find the tool on GitHub, and there is a even more automated version of the tool as well. Both links are below:
https://github.com/paolo-projects/auto-unlocker/releases
https://github.com/paolo-projects/unlocker/releases
How to create a MacOS Virtual Machine using VMware Workstation.
First make sure you have installed VMware Workstation and that it is operational (might require a reboot). Now close Workstation and proceed to patch your Workstation deployment to support MacOS.
Download the patch tool, and extract it to a folder in the same drive as your VMware Workstation deployment. This install is going to backup your original files so keep this install after in case you need to revert the changes. This also works best if your VMware Workstation is deployed in the default location.
Once extracted navigate to the extraction folder and run the Unlocker.exe file by right clicking on it and running it as administrator. This will launch a shell, pay careful attention to the output, if there are errors that a file could not be backed up or copied you may not have run the script as administrator. You can revert the changes by running Unlocker.exe --uninstall from an administrator command prompt. Then you can try again.
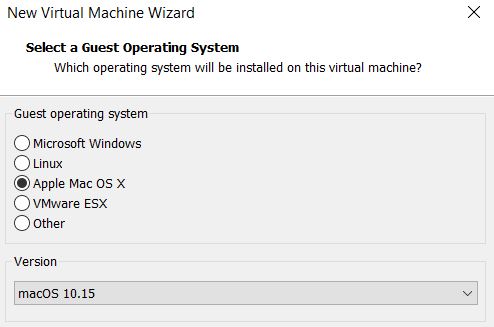
Now we we have successfully patched, we can restart VMware and create a Apple Mac OS X VM. In this case you will be creating a version macOS 10.15
Select Create a New Virtual Machine. Choose I will install the operating system later.
Now, select Apple Mac OS X, and change the Version to macOS 10.15. If you don’t see the macOS options, it is because the patch didn’t install correctly.
Next, you need to choose a name for your macOS Catalina virtual machine. Choose something easy to remember, then copy the file path to somewhere handy—you’re going to need it to make some edits in a moment.
On the next screen, stick with the suggested maximum hard disk size, then select Store virtual disk as a single file. Complete the virtual disk creation wizard, but do not start the virtual machine just yet.
You have now created a new VM, do not boot this VM!
Before you can boot the virtual machine, you must edit the hardware specifications. Plus, you need to tell VMware where to find the macOS VMDK.
From the main VMware screen, select your macOS Catalina virtual machine, then right-click, and select Settings.
Increase the virtual machine memory up to at least 4GB. You can allocate more if you have RAM to spare.
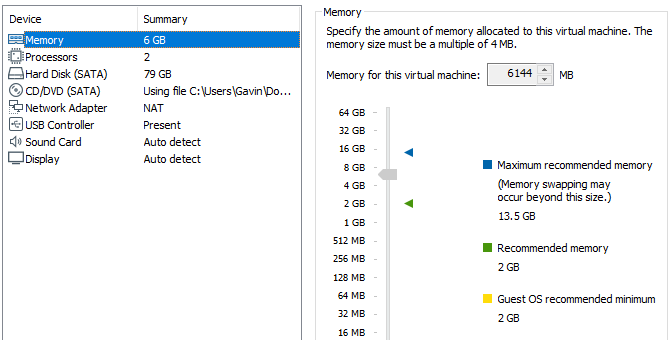
Under Processors, edit the number of available cores to at least 2.
Now, under Hard Disk (SATA), you need to remove the hard disk created earlier. Select Remove and VMware will remove the disk automatically.
Now, select Add > Hard Disk > SATA (Recommended) > Use an existing disk. Browse to the location of the macOS VMDK and select it. I recommend making a copy of the downloaded macOS VMDK and placing it in your VMs system folder. Then pointing to that copy in case you need to make more VMs in the future.
Now that that is complete, we need to edit the virtual machines .vmx file. Close VMware, and browse to the location you saved built your virtual machine in. Edit the file with a text editor of your choice and add the following line to the bottom of the file:
smc.version = "0"Save, then exit the editor.
You can now open VMware, select the MacOS vm you created and fire it up.
If you downloaded Gavin’s VMDK it will now run through the install and configuration process. Once that has completed and your VM is running (did you create that Apple ID on the website, can’t do it in the VM) you can now install VMtools.
With your MacOS VM running click on Edit -> Install VMware Tools…
This will launch a VMware Tools install dialog inside of your VM, follow the instructions. Your MacOS might block the installation of the package, click on the link in the block to allow the installation and then VMTools installation will complete.
Restart your VM, and you are good to go! You now have a working developer VM.