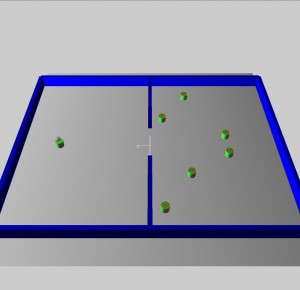
The Neuroevolutionary Solver or NS is a complete Evolutionary Artificial Neural Network software system. The NS framework allows for the creation of specialized problem applications which can easily have an EANN system integrated into them. The NS also includes an Autonomous Agent simulation system known as Simbad which provides a 3D simulation environment for evolution of robotic control systems.
Contents
- Features
- Download
- How to install and run
- Built in Experiments
- Source Code Structure
- Build your own experiments
- Known Issues
- Completely open source.
- Full Evolutionary Artificial Neural Network package supporting, weight evolving algorithms, topology evolving algorithms and hybrid (weight & topology) evolving algorithms.
- Extensible software structure with minimal modification required to original code.
- Full autonomous agent simulation system with a complete suite of sensors including, laser range finders, sonar, bump sensor belts, camera sensors, light output, light input detectors, and grapplers.
- Batch processing mode, for high speed simulation and scriptable parameter inputs.
- Full recording capability of learned neural network controllers.
- Learned neural networks can be restored to simulation agents in any environment via the holodeck.
- Both NEAT and SDNEAT algorithms fully implemented.
There are several download options. The most recommended is the Eclipse workspace as the software was designed to be easily managed through Eclipse. The experiments are short on user interface controls but are easily run and canceled from within Eclipse.
Eclipse workspace: NeuroevolutionarySolver-v1.01.zip (2.6 MB)
Source code only: NeuroevolutionarySolver-src.zip (400 KB)
Executable jar files: NeuroevolutionarySolver-jar.zip (2.0 MB)
The results files are actual experiment statistic records from NEAT and SDNEAT Avoider Robot experiments. They can be loaded into the Holodeck through the file load interface when opening a simulation.
Experimentation results: NeuroevolutionarySolver-results.zip (2.6 MB)
The example experiment files are parameter files for NEAT and SDNEAT experiments. They can be given as a command line parameter to any of the NEAT or SDNEAT Avoider Robot executable jar files or as parameters to the source or eclipse workspace versions of the program.
Example experiment files: experiment-parameter-files.zip (33 KB)
Requirements:
A few pieces of software are required to run the NS. Even the executable jar file downloads require this software. The NS can run on any version of the JDK greater than 1.5 and any Java 3D version greater than 1.3.
Java JDK or JRE:
The latest Java JDK or runtime environment can be downloaded directly from java.sun.com. The JDK and JRE download page is located here. Follow the instructions for your particular java package to install the software. If you install a JDK or JRE that does not support Java 3D you will not be able to run the NS.
Java 3D:
The Java 3D package provides the tools to render the 3D environments in the NS. The Java 3D download page can be found here. For windows users I recommend downloading the j3d-1_5_2-windows-i586.zip and not the executable installer. The executable installer doesn’t always place the Java 3D files in all the appropriate Java locations and may get confused if you have more than one Java install.
When manually install the recommended Java 3D files, it is also recommended to install the files directly into your JDK and JRE directories. While you can install them separately and include them in your CLASSPATH the NS has not been tested with this configuration and may not compile or run correctly.
To install the files directly into your JDK and JRE:
- Find the installation directory for your current JDK or JRE. In windows this is usually:
"C:\Program Files\Java\jdk1.6.0_07"(the version number may be different) - Extract the j3d-1_5_2-windows-i586.zip file. This will create a folder called j3d-1_5_2-windows-i586 which contains zip file j3d-jre.zip.
- Extract j3d-jre.zip which will also create a folder of the same name.
- Inside of j3d-jre.zip will be two directories named bin and lib.
- Select bin and lib and copy the two directories.
- Now go to your Java install directory (which may or may not be the same as in point 1.).
- Copy the lib and bin folders into these two paths (only the second path if you have it):
"C:\Program Files\Java\jdk1.6.0_07\jre""C:\Program Files\Java\jre1.6.0_07" - You may need to add the Java commands to your windows path. Right click my computer in your start menu and select properties from the menu.
- Click the Advanced tab.
- Click the Environment Variables button.
- In the System Variables window scroll down until you see the PATH variable.
- Select the PATH variable and click edit.
- Add the bin directory from your JDK path to this variable. Paste this to the end of the Variable value field (Your path may be different if you did not use the JDK version 1.6.0_07):
"C:\Program Files\Java\jdk1.6.0_07\jre\bin" - Exit these menus by click OK.
- Your Java and Java 3D install should now be ready to use.
Recommended.
Eclipse development environment:
Since the NS is a development piece of software for experimentation it really is not meant to run outside of a development environment unless the experiment you run with it should run to completion in a compute cluster or some other heavy computation environment.
To run personal experiments with the NS it is much easier to use it through a development environment like Eclipse. Eclipse is a full featured open source Java integrated development environment. If you are not familiar with Eclipse visit the software homepage for documentation.
The eclipse version of the NS is very easy to use. First download (64-bit versions from here) and install Eclipse onto your machine if you have not already done so.
1. Once you have installed Eclipse onto your machine run it for the first time.
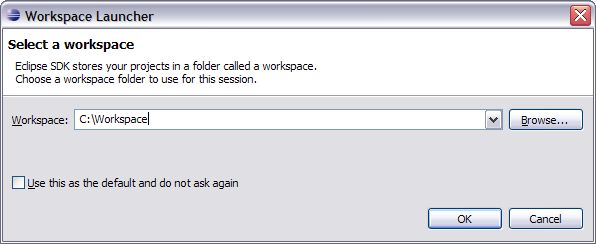
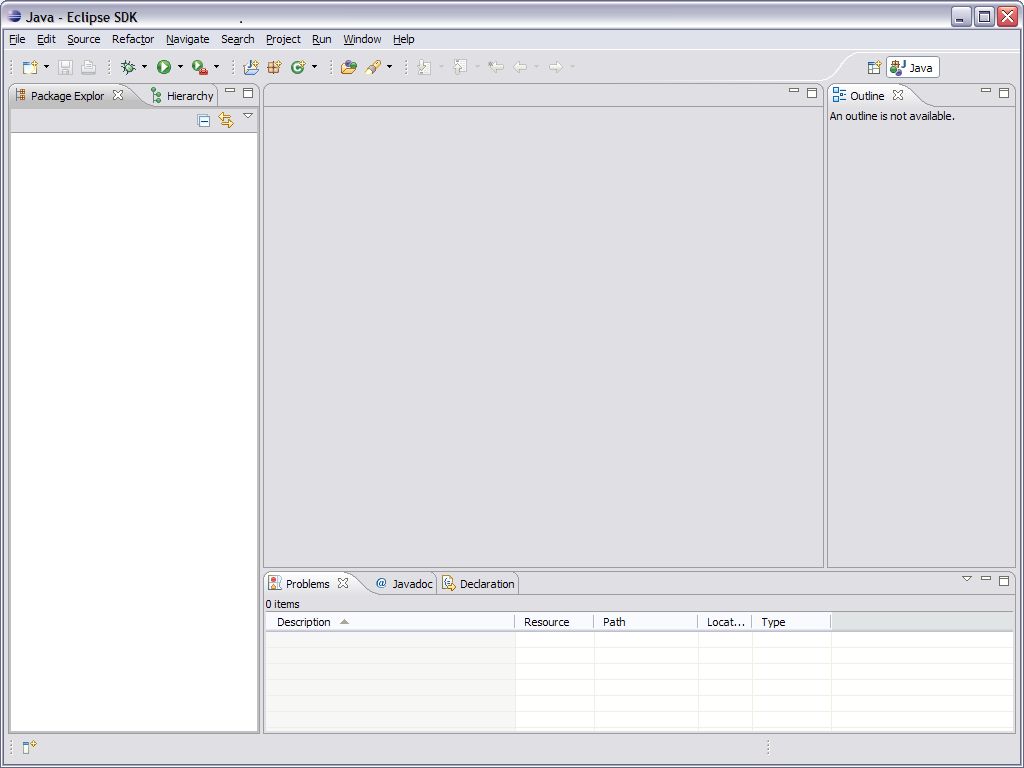
2. You will first see a screen that asks you to create a workspace with a suggested path. Change the path to something simple like C:\Workspace, D:\Workspace or even D:\NS-Workspace. Whatever you like. I suggest not using this as the default as it is easier to change to different workspaces if you don’t. Click ok and Eclipse will continue to open and you will see the Eclipse first time welcome screen. Click the X on the welcome tab to close this and you will now see the normal Eclipse development environment.
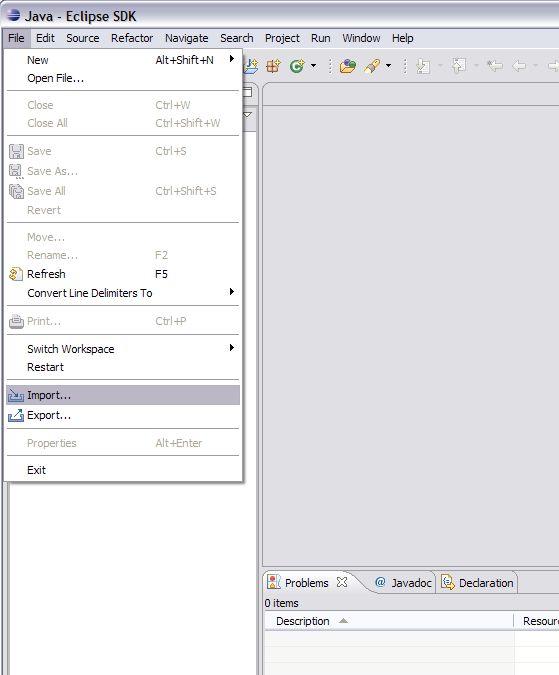
3. Now click the file menu and select Import.
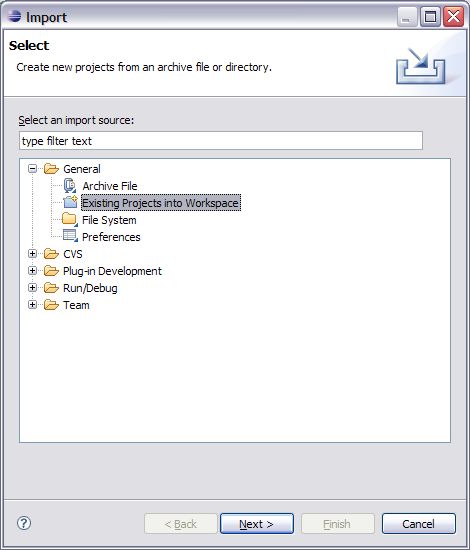
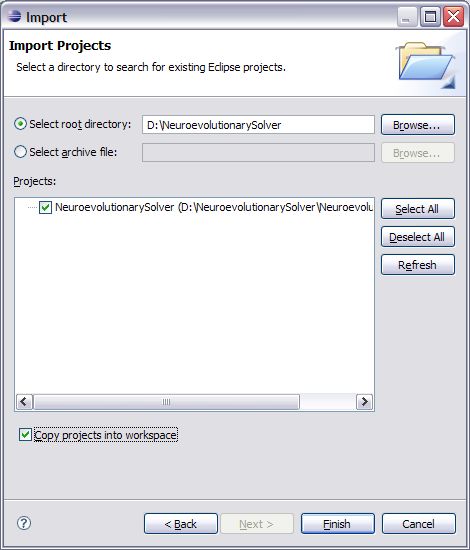
4. Once you have selected Import an Import dialogue screen will open up. Expand the general folder and select the “Existing Projects into Workspace” option and click Next.
5. Now browse to the root directory of the NeuroevolutionarySolver-v1.0.zip that you downloaded. If you have not uncompressed the zip file do that now before browsing to the folder. Click ok when you have browsed into this directory and Eclipse should identify the workspace information that was included with that download. Select the checkbox for “Copy projects into workspace” so that the source is copied into your newly created workspace and click Finish.
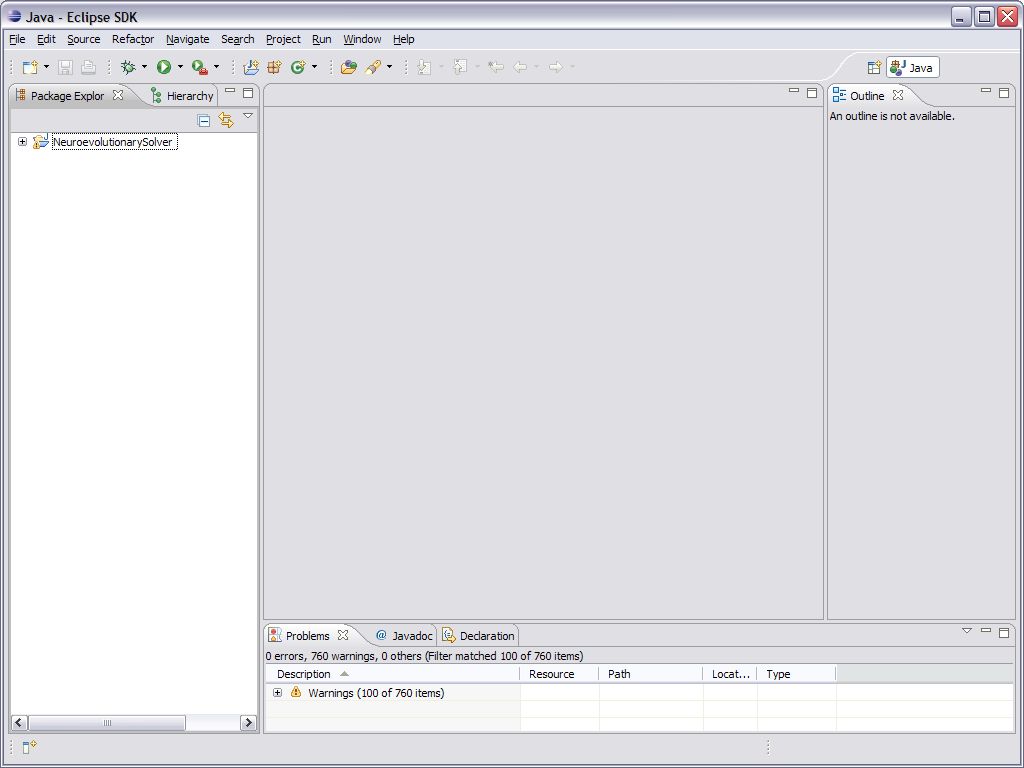
6. Eclipse will now import the entire NS into your newly created workspace. This may take a couple minutes depending on the speed of your machine. Once the import is complete and if your Java JDK and Java 3D were installed correctly you should now have a working version of the NS and there should be no errors in the Problem tab at the bottom of your Eclipse screen.
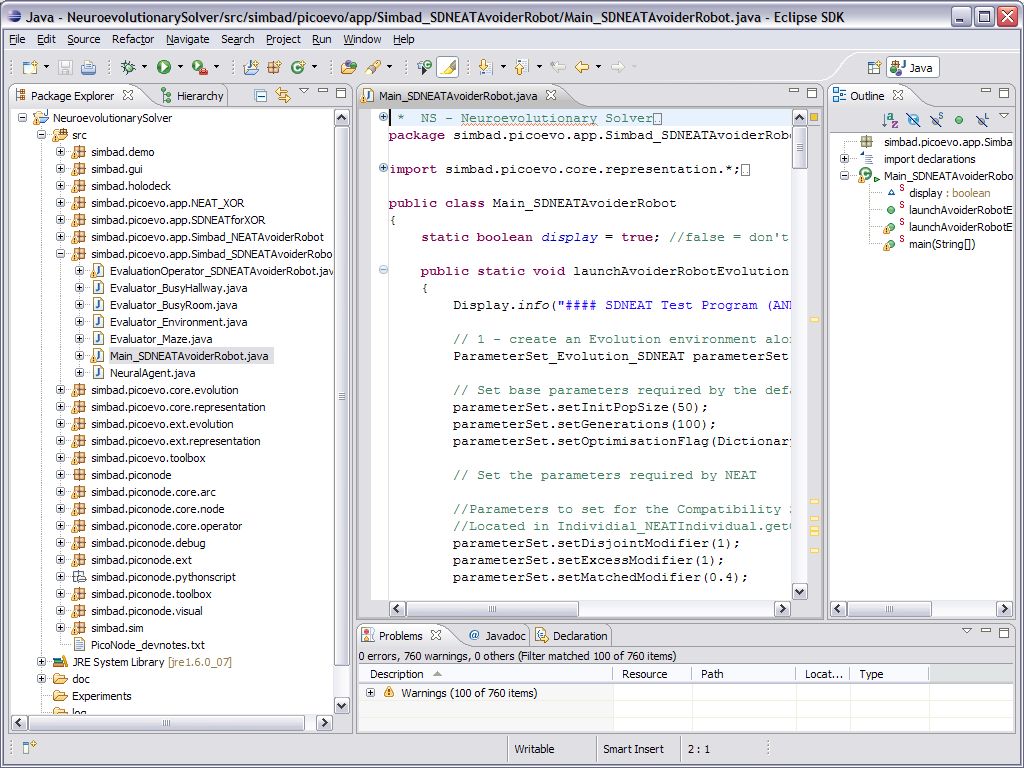
7. You can now test your NS install by expanding the NeuroevolutionarySolver in the PackageExplorer and browse down to one of the simbad.picoevo.app directories and double click one of the files entitled “Main_<experiment name>.java”. For example open the Main_SDNEATAvoiderRobot.java file under simbad.picoevo.app.Simbad_SDNEATAvoiderRobot.
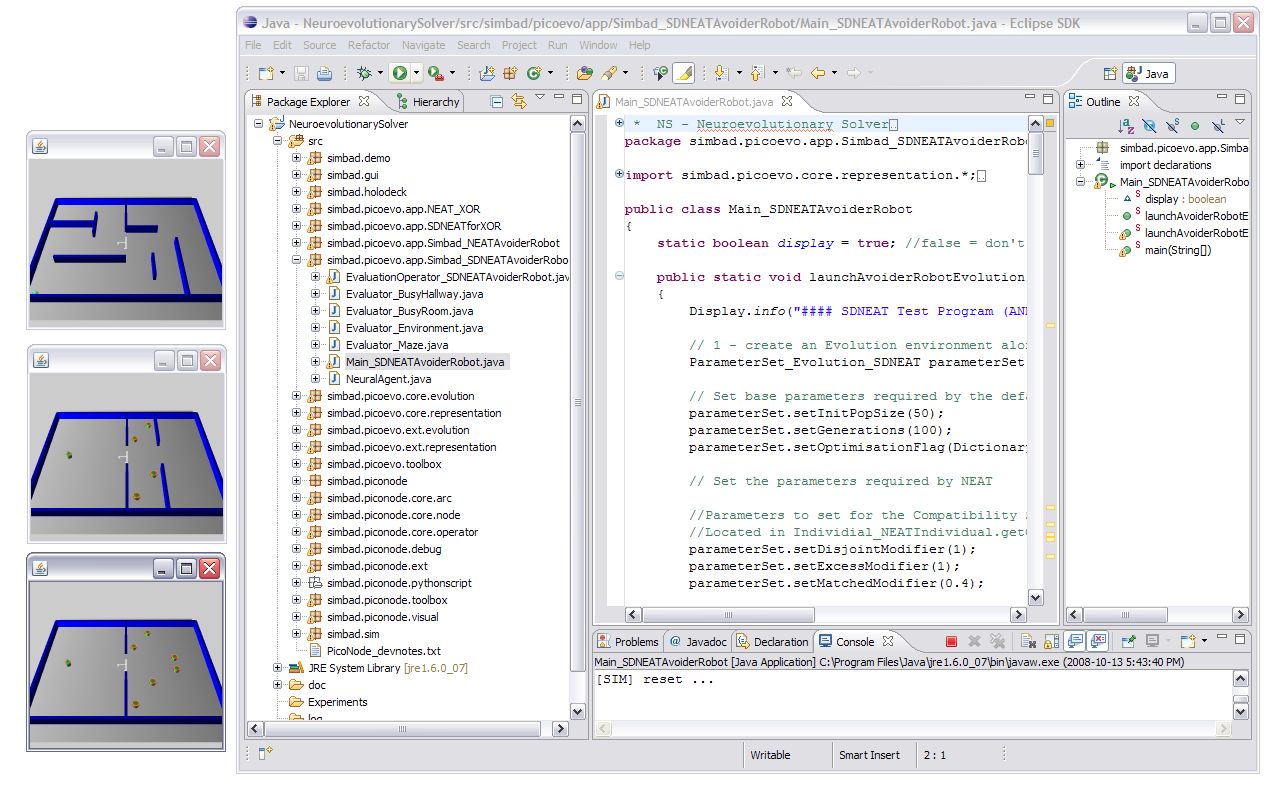
8. Now if you click the ![]() you will start the SDNEAT Avoider Robot experiment running. This will open three small 3D rendering screens to show the agents performing the experiment. They will all be stacked on top of eachother in the top left corner of your screen. You can move them around so you can see all three experiment displays.
you will start the SDNEAT Avoider Robot experiment running. This will open three small 3D rendering screens to show the agents performing the experiment. They will all be stacked on top of eachother in the top left corner of your screen. You can move them around so you can see all three experiment displays.
9. Since this experiment by default is rather long you can stop the experiment at any time by clicking the ![]() in the bottom right of your Eclipse screen. Congratulations you now have a running version of the Neuroevolutionary Solver on your computer.
in the bottom right of your Eclipse screen. Congratulations you now have a running version of the Neuroevolutionary Solver on your computer.
Execution Parameters
In the examples above the experiments each have some compiler parameters passed to them, specifically:
-Xms128m -Xmx1024m
The NS simulations are memory intensive and they require that the virtual machine workspace be extended past the default limit. These parameters set the minimum memory to 128 MB and the maximum to 1024 MB. Running a NS simulation with less than 512 MB of available memory is not recommended as the neural controllers of the agents in the population become more complex each generationthe memory requirement increases. If you have more memory available you can increase the upper limit as you see fit
To run your simulations using the execution parameters:
1. Run the experiment once to set up the Run Configuration. If you are following along from previous steps you have already done this. If you are not, click the green run button ![]() and then cancel the experiment by clicking the red stop button
and then cancel the experiment by clicking the red stop button ![]() .
.
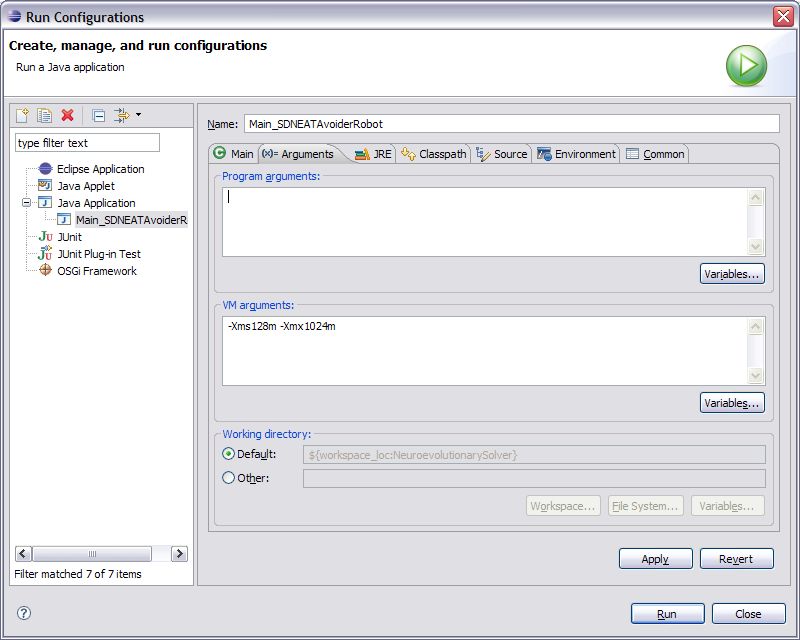
2. Open the Run Configuration for this experiment by clicking the down arrow next to the green run button and selecting the option “Run Configurations…” from the menu.
3. On the Run Configurations window that opens, select the Arguments tab.
4. In the VM Arguments window type in the memory compiler parameters as they are shown above, or change the variables to whatever memory configuration you would like.
5. Click apply and then click Close. Now the memory parameters are set for your experiment and each time you run the experiment it will use these parameters.
6. Don’t forget to do this for EVERY new experiment you create.
Parameter Files
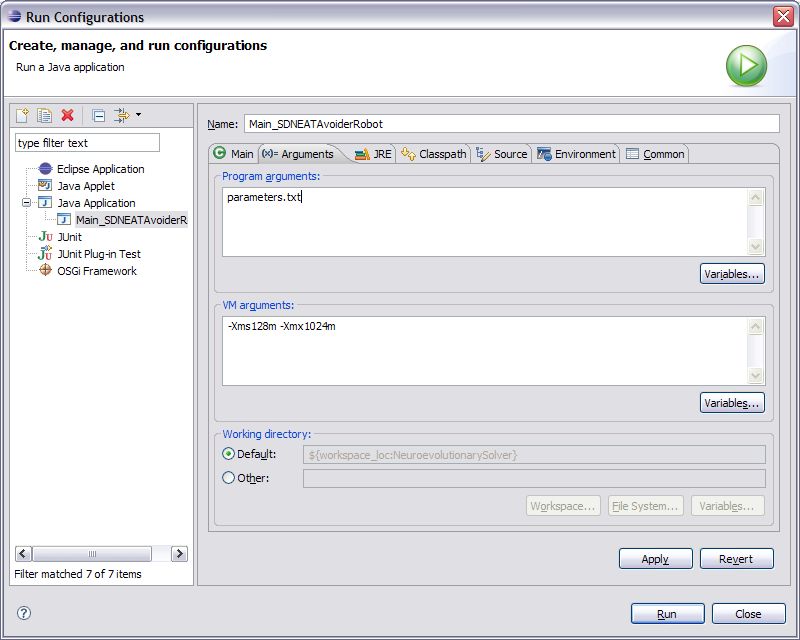
To run an experiment with a parameters file from inside of Eclipse, you have to specify the file name as an argument to the program.
1. Open the Run Configuration for this experiment by clicking the down arrow next to the green run button and selecting the option “Run Configurations…” from the menu.
2. On the Run Configurations window that opens, select the Arguments tab.
3. In the Program Arguments window type in the file name of your parameters file. It should be in the same path as your executable.
4. Click apply and then click Close. Now the experiment parameters file is set for your experiment and each time you run the experiment it will use these parameters.
5. Don’t forget that this file should be in the same path as your executable or you should specify the full path to the file in this screen. Otherwise your experiment will ignore the parameters file option and run with the parameters set inside the source code. The XOR experiments do not support experiment parameter files.
If you use a different java editor or like to work from the command line you can download the source code for the Neuroevolutionary Solver from the NeuroevolutionarySolver-src.zip link in the downloads section. Compiling the code can be a bit tricky so I will include some command line instructions for each environment.
Windows
Running the NS from the command prompt in windows is relatively simple. Assuming you have already set up your Java JDK and Java 3D with the instructions listed in the Requirements section you should be almost ready to go.
- Decompress the NeuroevolutionarySolver-src.zip file you downloaded.
- Open a DOS prompt and change directory to the newly decompressed folder so a ‘dir’ command displays the simbad folder.
- Run these commands to compile and execute NS simulations:
dir /s /b *.java > srcfiles.txtjavac @srcfiles.txtjava -Xms128m -Xmx1024m simbad/picoevo/app/NEAT_XOR/Main_NEATXOR
The last command is an example of a line to run one of the built in experiments. You can run any of the built in applications by running their “Main” prefixed file as shown above.
Linux
Using the NS in Linux from the command line is much easier. This article is focused on how to run the NS in a windows environment. If you are running Linux I assume you can follow the requirements section for installing the Java JDK and Java 3D and adapt them to a Linux install. Once that is complete running the NS from source in Linux is as easy as the Windows version.
- Decompress the NeuroevolutionarySolver-src.zip file you downloaded.
- Open a terminal and ‘ls’ into the newly decompressed directory.
- Run these commands to compile and execute NS simulations:
find ./simbad -name '*.java' -print > srcfiles.txtjavac @srcfiles.txtjava -Xms128m -Xmx1024m simbad/picoevo/app/NEAT_XOR/Main_NEATXOR
Those commands will allow you to compile and run one of the built in experiments. You can run any of the built in applications by running their “Main” prefixed file. These commands could also be placed in a simple make file called makefile:
build:
    find ./simbad -name '*.java' -print > srcfiles.txt
    javac @srcefiles.txt

run:
    java -Xms128m -Xmx1024m simbad/picoevo/app/NEAT_XOR/Main_NEATXOR
The NS can then be compiled by running the command “make build” and the experiment can be run by the command “make run”. This file can be extended to support all the experiments.
Execution Parameters
In the examples above the java execution line has some compiler parameters passed to it, specifically:
-Xms128m -Xmx1024m
The NS simulations are memory intensive and they require that the virtual machine workspace be extended past the default limit. These parameters set the minimum memory to 128 MB and the maximum to 1024 MB. Running a NS simulation with less than 512 MB of available memory is not recommended as the neural controllers of the agents in the population become more complex each generation the memory requirement increases. If you have more memory available you can increase the upper limit as you see fit.
Parameter Files
If running a large number of different experiments, the parameters of your NEAT or SDNEAT experiment can be changed by passing a parameter file to the command line execution of the program. You can download some example experiment parameter files above in the downloads section. The description of the parameters is available in the Built In Experiments section. An example of running an experiment at the command line with a parameter file is:
java -Xms128m -Xmx1024m simbad/picoevo/app/NEAT_XOR/Main_NEATXOR parameters.txt
The XOR experiments do not support experiment parameter files.
If you would like to just do some experimentation with the existing XOR and Autonomous Robot simulations you can use the pre-compiled versions. The pre-compiled experiments will perform default experiments with built in experimentation parameters, in order to change these parameters a properly formatted file must be passed to the experiment on the command line.
To run these experiments from the command line, download the file NeuroevolutionarySolver-jar.zip and decompress it. If you have installed the required Java JDK and Java 3D as listed above correctly, you now should open a DOS command window or if you are a Linux user open a Terminal change directory to the newly decompressed NevolutionarySolver-jar directory. Once there, simply type one of the .jar file names and hit enter, for example:
D:\> NEATAvoiderRobot.jar
That will execute the NEAT based Avoider Robot experiment. The problem with the command line experiments is, they were designed to be run to completion. They will only properly exit if you allow the experiment to complete. If not, you will have to kill the process from the Task Manager in windows or from the terminal command ‘kill’ in Linux.
Running The Holodeck program from the command line does not have this problem as The Holodeck can be exited by clicking the close program button (the red X in Windows) in the top right corner of the program window.
Execution Parameters
In the example above the java execution line does not have any compiler parameters passed to it, specifically:
-Xms128m -Xmx1024m
If you are running full experiments using the executable jar files it is HIGHLY recommended that you pass the memory command line parameters shown above to the executable as is shown below:
java -jar-Xms128m -Xmx1024mNEATAvoiderRobot.jar
The NS simulations are memory intensive and they require that the virtual machine workspace be extended past the default limit. These parameters set the minimum memory to 128 MB and the maximum to 1024 MB. Running a NS simulation with less than 512 MB of available memory is not recommended as the neural controllers of the agents in the population become more complex each generationthe memory requirement increases. If you have more memory available you can increase the upper limit as you see fit.
Parameter Files
If running a large number of different experiments, the parameters of your NEAT or SDNEAT experiment can be changed by passing a parameter file to the command line execution of the program. You can download some example experiment parameter files above in the downloads section. The description of the parameters is available in the Built In Experiments section. An example of running an experiment at the command line with a parameter file is:
java -jar -Xms128m -Xmx1024m NEATAvoiderRobot.jar parameters.txt
The parameters.txt file can be replaced with any file name as long as the values inside of the file conform to the experiments requirements. The XOR experiments do not support experiment parameter files.
The Neuroevolutionary Solver has several pre-built experiments that you can immediately start experimenting with, modify for your own purposes or use as an example for your own completely custom experiment.
Available Experiments
The Neuroevolutionary Solver has two evolution of artificial neural network experiments pre built and ready to be used.
XOR
The XOR experiment can be used as a basic benchmark for the capability of a evolutionary artificial neural network system to solve complex problems using neural networks. XOR is a binary logic function. Logic functions are used in both computer software and hardware to solve logic problems.
XOR’s output values are not linearly separable. This means that the two types of output values, one and zero, cannot be separated by a single linear function. The XOR function cannot be solved by neural networks that have no hidden nodes. This makes XOR a good function with which to evaluate a neuroevolutionary algorithms ability to solve problems that require topological growth.
Dynamic Obstacle Avoidance
The problem of dynamic obstacle avoidance is huge. It can vary enormously in scale, involving small simulated autonomous agents avoiding tiny obstacles in a maze, or powerful non-virtual robots moving pallets around in a warehouse. To attempt this problem effectively, a domain must be defined to perform experiments in and gather results from.
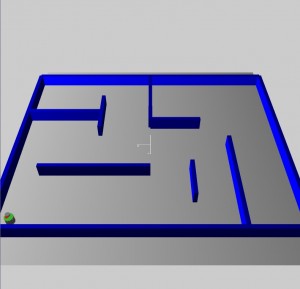
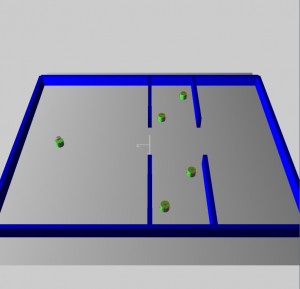
The problem domain used in this experiment is a simulated set of static and dynamic environments. The environments include a maze, a busy hallway and a busy room. The three environments are designed to require an increased level of complexity in the avoidance behaviour required to master them. During an experiment, the agent being trained is placed in the maze environment first, then the busy hallway environment and finally the busy room environment. Training takes place in all the environments and the agents’ fitness is based on their performance in all three environments.
The maze environment does not require dynamic obstacle avoidance. Agents that solve the maze must be able to navigate from the south west corner to the north east corner where a goal has been placed. The busy hallway environment requires dynamic obstacle avoidance where the obstacles are not likely to be in the way most of the time. The agent starts in the west room and must move to the opposite coordinates in the east room. The busy room environment is similar to the busy hallway environment since the northern and southern agents move in exactly the same pattern. However, this last environment adds another level of complexity. There are two agents in the east room that move to goals in the west room. These are timed to arrive at the hallway at the same time as the hallway agents converge at the opening. This creates a complex random traffic pattern as all six agents attempt to avoid each other. Their turning avoidance algorithms result in numerous collisions. This environment is designed to force the learning agent to collide with other agents.
In this experiment each genome is placed in each environment for thirty thousand time slices and is allowed to train its neural network controller for that amount of simulation time. Since the agents are evaluated for their performance in three separate environments, the total amount of training time per agent is ninety thousand time slices. The initial population of genomes are comprised of identical genomes. Each genome has thirteen input node genes, two output node genes and twenty six link node genes, and their initial weights are set to one. All of the nodes used log-sigmoid activation functions and their bias values are set to one. The bias values cannot be changed by mutation or neural network training. The input nodes accept values from their simulated neural agent’s twelve laser range finders and single GPS range measurement. The output nodes provide values to the simulated agents for translational and rotational velocity.
The fitness of each genome in each population is defined as the sum of its calculated fitnesses in each evaluation environment. The function is replaced by a static fitness value of five when the agent has arrived at its goal.
Figure 1: The variable s is the speed of the neural agent, a is the angular velocity of the neural agent, m is the maximum sensor value currently detected by a laser range finder and d is the current distance from goal. The constants c1,c2 and c3 were set to 1.0, 1.6 and 1.0 respectively. The maximum sensor value from a laser range finder is 1.5. However, because the sensor readings may incorporate random noise with a maximum value of 0.1, the value of c_2 is 1.6 so as to preclude negative fitness values.
The agent is considered to have arrived at its goal when it is within 0.5 simulated meters of it. The fitness function evaluates the fitness of an individual genome for one time slice. The genome’s fitness values for each time slice are summed over the course of its navigation through each simulation environment to produce the overall fitness value for that generation of the genome.
Available Algorithms
NEAT
SDNEAT
Running an Experiment
Reviewing an Experiment with The Holodeck
Package Overview
Algorithm Code
Experiment Code
Creating Custom Agents
Building Custom Environments
Custom Experiments
Interfacing your experiment with NEAT or SDNEAT
- Java 3d interfaces cannot be minimized as this can cause a memory leak and can crash the program. This is a problem with Java 3d not the NS.
- Simulation load screen sometimes hangs when loading an experiment in the Holodeck.
